
6 Different Ways to Easily Transfer an Image
We’re sharing different ways to transfer an image onto paper or canvas and create your own art from an illustration or canvas!
If you’ve spent any time working with images you may want to transfer them from one surface to another. There are countless ways to make this work but for now we are going to concentrate on how to transfer an image onto paper or canvas.
If you’re online and you find a beautiful image that you’re wanting to paint you have to figure out how to get it from your computer screen to your canvas.
Well we’ve got a few ideas for you to try, and ways to easily source what you need to make this work. So check out these ideas.
~This post may contain affiliate links. If you click one and make a purchase, I may receive a commission at no additional cost to you. This helps us fund creating great content for you! For more information see our disclosure ~
Here’s a Great Place to Find Images!
Don’t Try to Trace It
Wait, what?
I know this is directly opposite of what we just said we’d share here, but have you considered just trying to freehand the image? Or even just using the image as an inspiration and making something completely different?
This may be the easiest or hardest way to transfer an image. Sometimes we have an idea of exactly how we want something to look and sometimes we’re willing to experiment.
So believe us – we understand that there’s a safety in having the image transferred exactly like it looks when you find it. And of course we are going to share all those ways, so just keep reading!
Use a Grid to Transfer an Image
It’s a pretty quick job to draw gridlines over an image and on your blank paper or canvas. Then you just have to fill in each box with the lines to get your image on it.
All you have to do is erase the grid lines when you’re finished and you’ll be surprised at what an easy transfer this is.
If you’re not comfortable trying to freehand the image this is probably the next easiest way to get your image from one surface to another.
Pro Tip: Turn the image upside down to transfer it. This will make you less critical of your lines and you’ll be surprised at how much easier and quicker it is. It’s just a little trick for your brain.
Really.
If you’ve got the image on your phone or computer you can use an app to add gridlines onto your image. There are lot’s of them available and you can customize how many boxes you’d like which makes a huge difference when you’re working with images.
A more detailed image will take a lot more boxes but a simpler image will take less.
The app that I’ve found easiest to use is this one. But take a look around and find the one that works the best for you.
If you don’t want to draw right onto your image just put a piece of clear acetate over it. Put your grid on the acetate and you’ll have your boxes to copy. This way you don’t have to draw on your image!
Transfer an Image by Tracing
There are lot’s of ways to trace an image so here are a few using a light source.
Use Your Computer Screen
Since we all are probably using a computer or tablet of some sort to find our images, you can easily use that as your light source to transfer an image.
Turn your monitor to it’s brightest setting, open your image to full screen and gently tape your paper to your monitor. You should use painter’s tape or washi tape because they are low adhesive so they shouldn’t damage your paper or your computer equipment.
You just need enough tape to hold your paper secure so that you can trace. If you’re super talented you don’t even need tape, you can use one hand to hold your paper and one to trace.
Don’t forget to turn off your auto sleep function. Unless you can trace way faster that we can!
Use a Lightbox
A lightbox used to be a fairly big expense but like all technology, you can now pick one up fairly inexpensively.
We found one on Amazon for around $20 and it’s a handy piece of equipment to have around.
Now if you’re just going to use it for one project, you definitely don’t want to purchase a light box. It’s only a good purchase if it’s something that you’ll use regularly.
But guess what? We’ve got some DIY Light Boxes you can make!
Use a Window
If you’ve got a nice sunny window that’s probably all you need to be able to trace an image. Just like using a light box, just layer your image under your paper and you can trace right over it.
Of course this will mean that you need to print your image. Sometimes it may be easiest if you print it in black and white to get the best lines to follow. View it with color and without to see what will be the easiest to trace.
You’ll have to tape your image to the window and likely tape your blank sheet over that too so be sure that you use low tack tape. Painter’s tape and washi tape are going to be your best options for this.
Make a DIY Light Box
You might not need to purchase a light box if you’ve got a clear surface that you can use! Not just your window but a table of any sort.
I’ve got a glass patio table and I can put a lamp underneath it and turn it on and voila, it’s a DIY light box.
I hate to admit it but I’ve even used this method since I’ve purchased my light pad because the surface of the table is much larger, so it’s definitely better for those bigger projects.
You can even try a clear plastic tub. It should be clear enough that the light will shine through, just flip it upside down and put a lamp underneath.
We love it when we can find a quick and easy way to make something work!
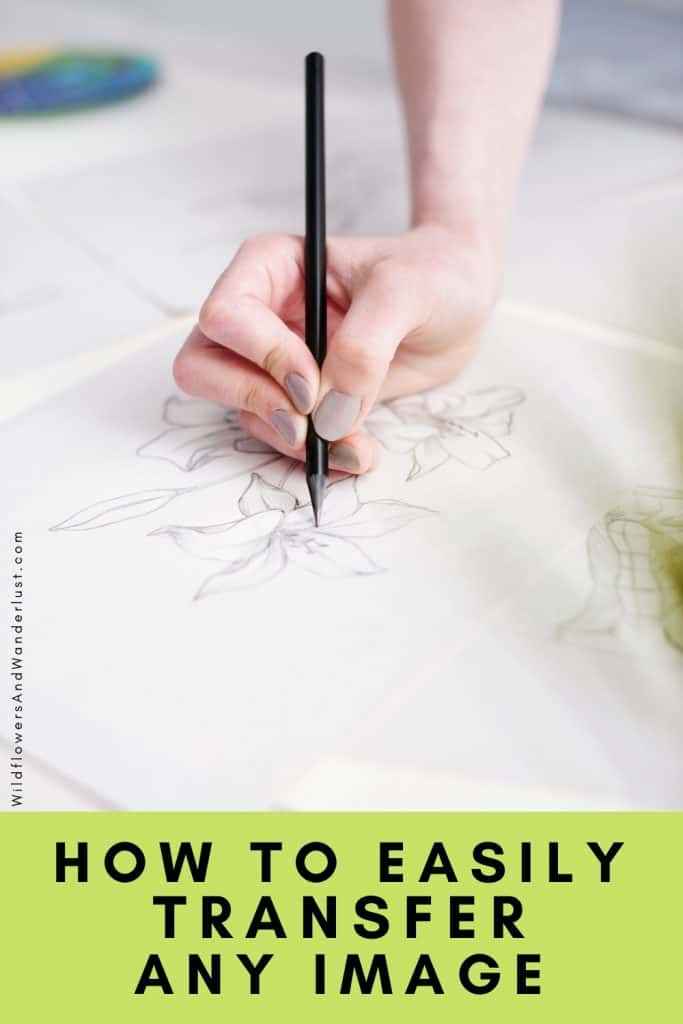
Transfer an Image with Tracing Paper
Tracing paper is easily found at any craft store, but you can also use parchment paper from your baking stash as a substitute. As long as you can see through it to trace it will work.
Lay your tracing paper (or baking paper) over your image and trace it. When you are finished, flip it over and use a pencil to gently cover the back side of your drawing. Then lay your paper over you new paper or canvas and trace the lines again. The pressure on the graphite from your pencil will make the marks appear on your new blank surface.
Transfer an Image with Transfer Paper
Transfer paper can be found in a craft store or an office supply store. It’s usually pretty inexpensive, it’s just not something a lot of us have on hand so that’s why it’s our last suggestion.
This one is opposite of the tracing paper, you actually set your art on top of the transfer paper and trace it. The pressure of your pencil transfers the image onto your paper or canvas. In fact you don’t even have to use something that will draw onto your original image, it just has to be sharp enough to cause a line to show on your canvas. The pressure on the transfer paper is what makes the lines.
The bonus of this method is that you can use the transfer sheets more than once.
Note: You will want to purchase graphite paper. It’s also known as transfer paper but when I was searching for it I mostly found heat transfer paper and that’s a different material.
This type of paper used to be made from carbon, and you still may be able to find that but it’s pretty messy. The graphite paper won’t turn your fingers purple the way carbon will and you can also erase it a lot easier.
So those are the easy ways you can transfer your image to make a new piece of art. This is such a great method if you’re planning to paint something, or you need an outline to work with.
Do you have another method to transfer an image that we missed here? Let us know in the comments and we’ll include it!
Follow us on Pinterest and on Instagram for lot’s more ideas and inspiration!
Are you looking for more great DIY ideas? Be sure to check these out:


I like it when folks get together and share ideas. Great site, keep it up!