How to Make Coastal Crescent Wall Art
Are you ready to make a cute and easy coastal crescent wall hanging? We’re using some found seashells and leftover beads to make a fun piece of art!
You don’t have to live on the coast to enjoy this cute crescent wall art that we’re sharing today.
For that matter, you don’t have to use shells, or even the crescent shape to make your very own art – we’re just here to share some inspiration so that you can DIY art that works in your space! Your art can be personalized to your favorite scavenged items and colors!

Supplies List for Crescent Moon Art
We’ve got an easy list of supplies that you need to make this art! You can use art supplies that you already own (like we did) or you can purchase them!
- Craft foam or cardboard sheet
- X-acto knife or scissors
- Different kinds of beads
- Different kinds of shells
- Hot glue
- Pencil
- Yarn or rope strands – we like to use 4mm macrame cord
- A pair of scissors


You can use any cardboard or stiff paper for this project – we’re betting that we’re not the only ones with some delivery boxes waiting to be recycled!
~This post may contain affiliate links. If you click one and make a purchase, I may receive a commission at no additional cost to you. This helps us fund creating great content for you! For more information see our disclosure ~
Instructions for Crescent Wall Art
To get started with this project you’ll want to cut out your shape! We’re using the crescent moon but feel free to use a star, a moon, a heart or any other shape that you love!
Remember that your art can be the same as we’re showing you, or you can feel free to embellish it into your own special wall hanging.
Step One

We just used our pencil to draw a crescent shape on a piece of craft foam. The edges don’t have to be perfect since we’ll be gluing shells and beads onto them so there’s no need to be extremely exacting on this step.
You can always touch up the edges later if you find that they show after you’ve attached your beads and shells.
If you’re using cardboard or thick paper you can use scissors for this step but if you’re using foam board it’s much easier to cut with a box knife or x-acto knife.
Step 2

Add your yarn or macrame cord to the bottom of your design. If you need to scroll down to the finished photo to see what ours looks like we’ll wait right here!
Got it? It adds a fun touch along the bottom of the art!
We used hot glue for attaching everything to our art. Craft glue takes a longer time to dry and since the hot glue dries clear we like how it looks when it’s finished.
It’s also much easier to push shells down into a blob of hot glue!
Step 3

Now comes the fun part – adding the embellishments.
We are using beads, stones and seashells for our art. That’s why we’re calling it a coastal piece but you can use baubles that you love in the colors and shapes that work for you.
This could also be a fun kids craft using foraged items – like sticks and flowers that they’ve picked up on a hike.
But back to our project!
We suggest that you start at the tip of the art and work your way down.
Use your larger pieces first and then fill in with smaller beads and baubles around them.
Step 4
(we should have included this in step 2)
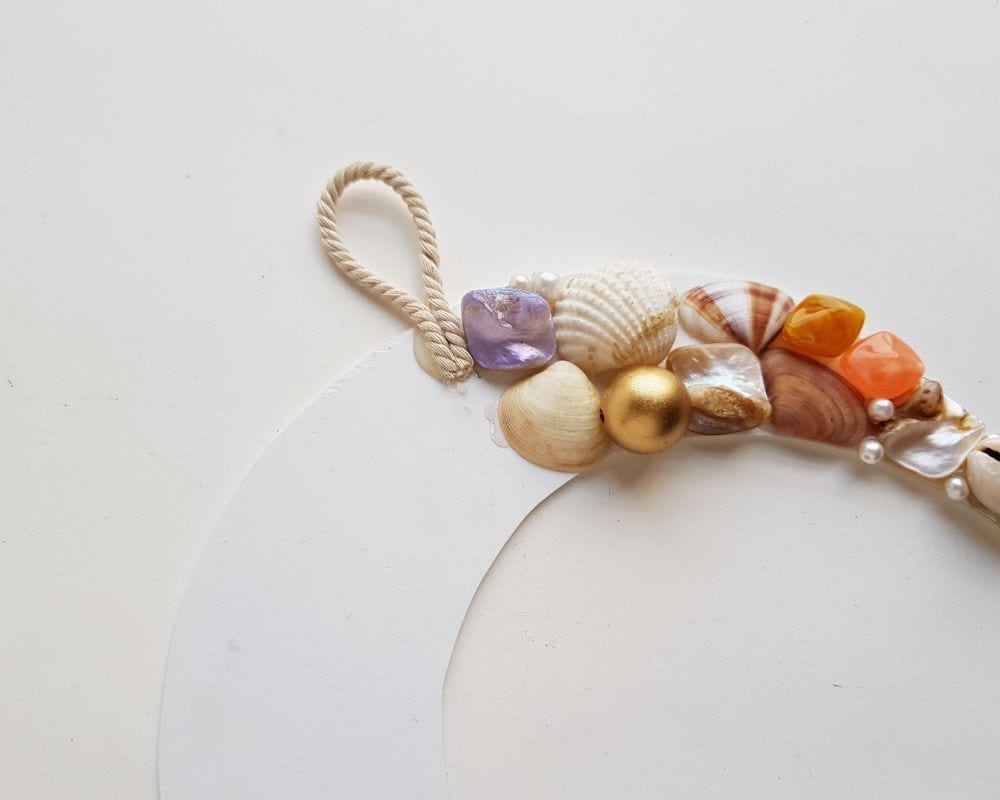
Before you completely fill the top make a loop for hanging your art.
You can easily form a loop out of the yarn or macrame cord that you’re using.
And yes, we should have done this step at the very beginning but here we are adding it now!
Step 5

This is pretty much the remainder of the steps, filling in your design with your baubles.
If you’re using the crescent shape like we are then you’ll want to move to the bottom tip and work your way toward the middle.
It’s easier to fill in the larger spaces than the smaller ones so if you’ve chosen a star you’ll definitely want to work on all the points first and leave the body for the last part.
Be sure that you cover the area where you’ve attached your cording well.
Step 6
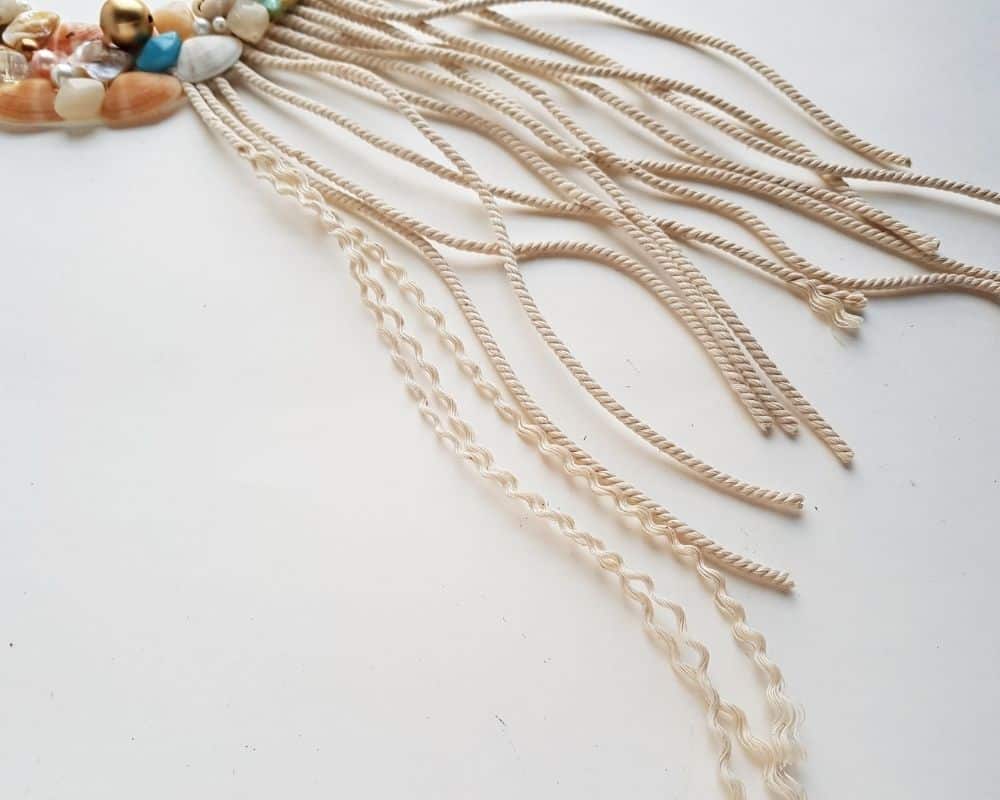
Once you’ve got your base filled in to your liking it’s time to unwind your cords!
If you’re using yarn, macrame cord or rope just untwist it so that it has a more feathered look to it.
If you’ve used very thin cord it might be helpful to comb through it with an actual hair comb – we find that’s an easy way to get the fraying to look the best.
Step 7
Once you’ve unwound the cord you may want to use the scissors to even up your edges.
This is also when you can touch up any spots that don’t look as great as you want them too. We like to hold our wall hangings in an upright position (like they’d look on a wall) so that we can see what needs to be fixed in real time.
Step 8
That’s it! You’ve finished your coastal crescent wall art and now all you have to do is find the perfect spot to hang it!
Or wrap it up for a gift!
We found a few hot pink feathers in the bottom of our box we decided to glue them onto the bottom because everything looks better with some hot pink on it right?
Follow us on Pinterest and on Instagram for lot’s more ideas and inspiration!