How to Make a Cute Washi Tape Birthday Card
This is an easy tutorial on how to make a washi tape birthday card. We’ve included some other idea’s for inspiration as well!
What is Washi Tape?
Are you wondering what washi tape is or are do you already have a huge stockpile of it?
It’s another one of those craft addictions; once you find it you’ll need every color, every pattern, you’ll understand once you’ve started using it.
Washi tape has become a popular accent to use in crafting the last few years. It started off mainly as an embellishment for scrapbooking but many people have figured out how to use it as its own decoration for other crafts. Boy are there some creative people!
Washi tape is originally from Japan, where they commonly call is masking tape. It’s a lot different than what we call masking tape here in the US.
There are a many reasons that we love Washi tape, and not only because its reusable and biodegradable.
The adhesive that is used to make it can be silicon, rubber or acrylic depending on which brand you choose, but it doesn’t leave a sticky residue when removed. It can be lifted and moved even from most papers, which makes it perfect for crafting. That’s a bonus for people like us, who want to get halfway through a project and change it.
~This post may contain affiliate links. If you click one and make a purchase, I may receive a commission at no additional cost to you. This helps us fund creating great content for you! For more information click here ~
The Benefits of Washi Tape
Well, to start with, washi tape comes in every color and pattern imaginable.
I mean you can find washi tape to fit almost any project you’re working on so that’s a plus!
It also comes in different widths, making it easy to use for projects. There are so many benefits:
- Comes in Different designs, colors and patterns
- Available in different widths
- Easy to Use
- Self-adhesive
- Sticks to any surface (at least any surface we’ve tried so far!)
- Easily removable (bonus for crafting because it’s adjustable)
- You can tear it off by hand
- Most can be written on
One of our favorite things about washi tape is that it will stick to virtually any smooth surface!
Really, it will stick to glass, wood, metal, or paper. If you’re not happy with how it looks when you first apply it you can peel it right up and reposition it. It doesn’t leave a sticky mess when you remove it.
It’s also acid free so it won’t damage photo’s or papers. There are probably other benefits that we haven’t listed here but really, it’s amazing stuff!
How to Use Washi Tape
Well I guess we could start off by asking how you wouldn’t use washi tape?
If you’re thinking about using tape in a project you can probably use washi tape for it. We don’t recommend it for a construction project but other than that there are few places that couldn’t use a little happy pattern or color.
Washi tape is a quick and easy way to embellish almost any surface.
Here are just a few ideas on what to do with washi tape, but we’re sure that once you have a roll in your hand you’ll find all kinds of places that can use a touch of tape!
- Scrapbooking
- Embellish Gift Wrap
- Embellish a Greeting Card (scroll down to see ours)
- Decorate a notebook or planner
- Use it to stick photos and memento’s to your walls (which is great in dorm rooms and rentals)
- Embellish furniture and other objects
- Party Decor
- Wrap candles or tealights
- Drink Flags or cupcake toppers
- Make a pattern phone case
- Use as wallpaper
A Washi Tape Birthday Card
Onto making the washi tape birthday card!
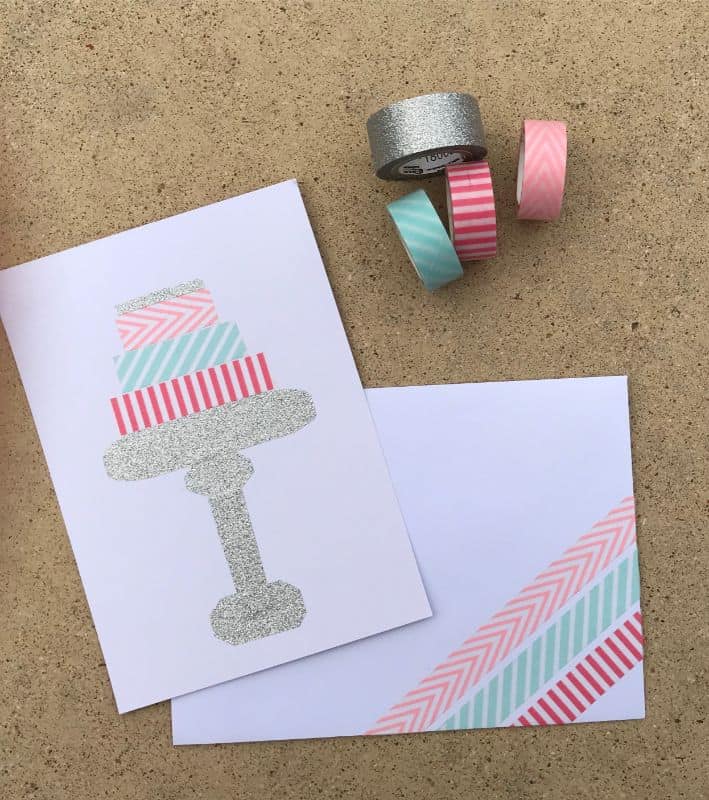
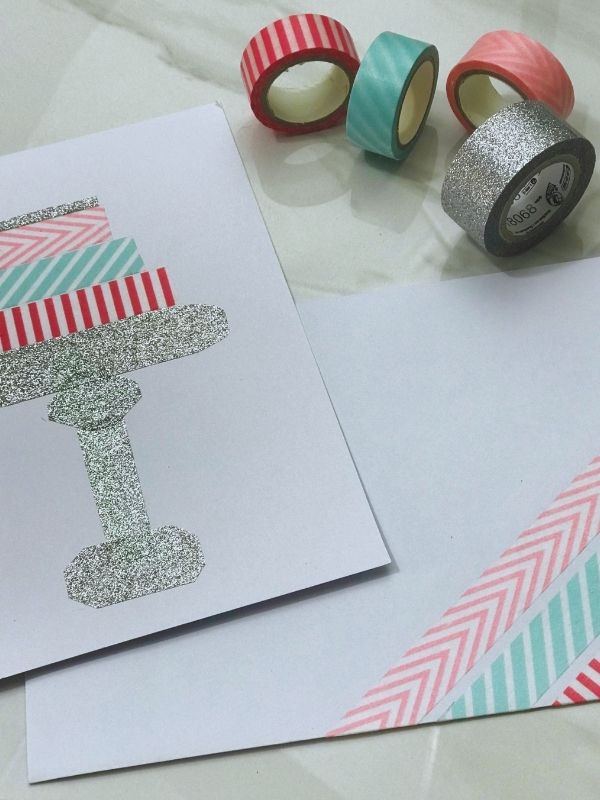
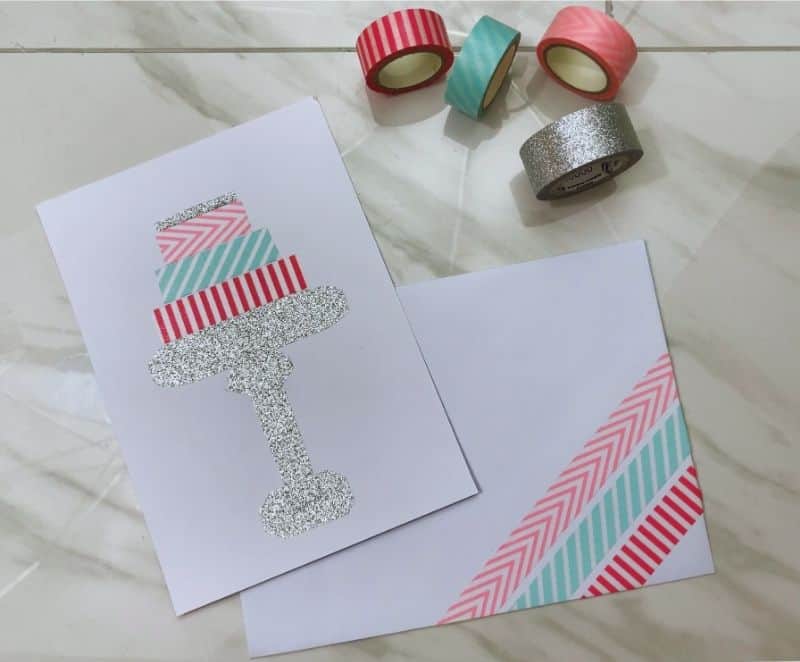
You can probably just look at the photo of the card and not need a tutorial on how to make one – pick some pretty washi tape and stick it to a card right? Yep, it’s that easy.
The glitter washi tape makes a great pedestal for a cake on a birthday cake card.
I used scissors to shape the tape but I think that it would have been much easier to stick the tape onto a cutting mat and use an exacto blade to make it more precise. The lines would have looked much more professional too, so next time I will definitely do that.
I embellished the envelope to match the card by adding some washi tape strips to the front of it.
When I get ready to mail it I will likely add some tape to the back where the seal is too. I’m thinking that adding a balloon or a heart will be a cute addition.
After I took the photo’s I drew a couple of candles on top of the cake with a thin sharpie. I think that makes a cute addition to the top of it. You could also leave room at the top to write in Happy Birthday – or even use stickers for that.
I’m not talented enough to cut letters out of washi tape, but I bet there’s a way to do that.
Hmm, that’s going to be an experiment for another day – matching letters……
Supplies for a Washi Tape Birthday Card
- Cardstock paper or blank card
- Envelope
- Glitter washi tape
- Various pattern or colored washi tape (we used 3)
- Ruler
- Pencil
- Scissors or Cutting Tool
- Pen or Sharpie for embellishment
To Make the Card
Start with your glitter washi tape and make your cake base first. You’ll want it to be pretty close to the center of the card so if you start with that piece it makes it easier to place the others.
You can use a pencil to mark the center of your card so that it’s easier to place. Getting the first piece on straight is the hardest part, once you’re happy with it the other pieces are much easier to place.
Measure your card and make your strip about 3/4 of width. I used the scissors to round the corners. You can make them round or cut them at angles depending on your preference.
After that you just want to cut strips and piece them to make the remainder of the card. Easy peasy.
To make the envelope I just added the tape at an angle and used scissors to trim it after it was stuck down. Then just add some embellishments with a pen or leave it as is. Either way it’s a great card.
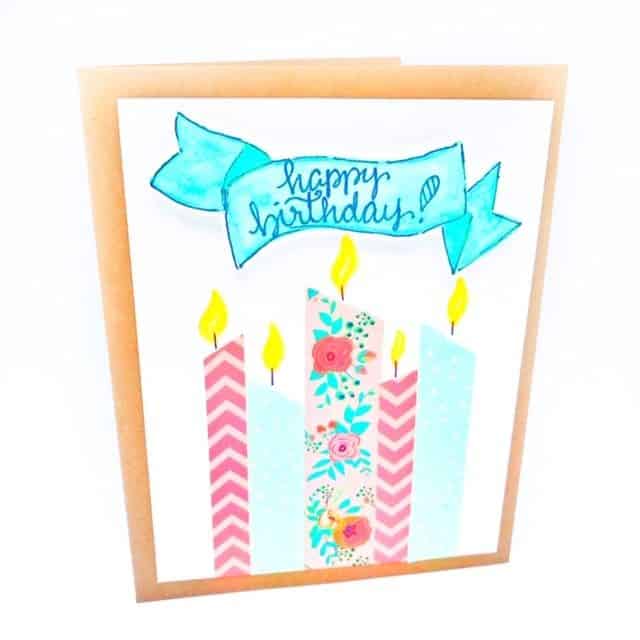
We also love this card style. Use washi tape to create candles and a pen to embellish!
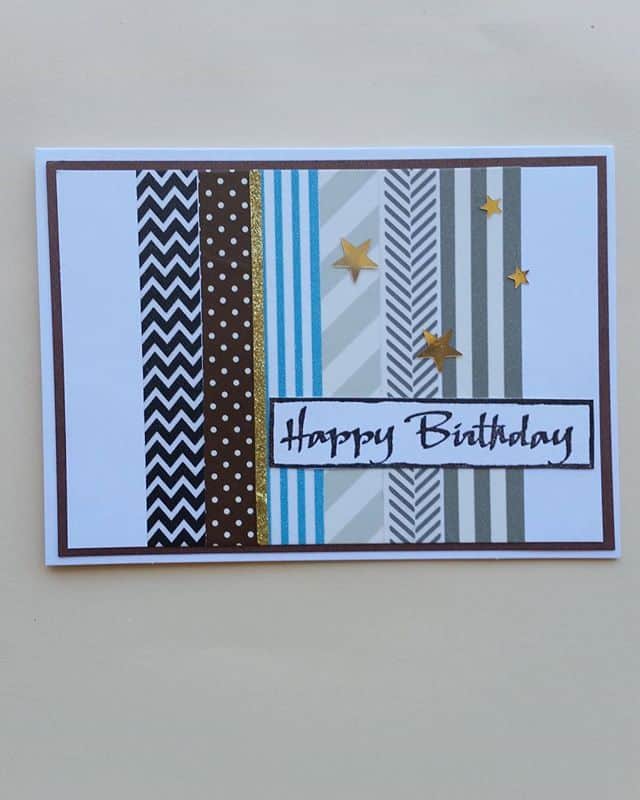
And here’s a more masculine styled card – still just using some washi tape – and some gold stars!
You might also enjoy our post on Torn Paper Greeting Cards.
Have you already tried making a washi tape card?
A birthday card or any other kind of card?
Since you can easily tear or cut the tape this is a great project for kids to do too. Share your creative with us so we can see all your great designs, and of course be sure to save it on Pinterest so you’ll be able to find it later!
Follow us on Pinterest and on Instagram for lot’s more ideas and inspiration!