
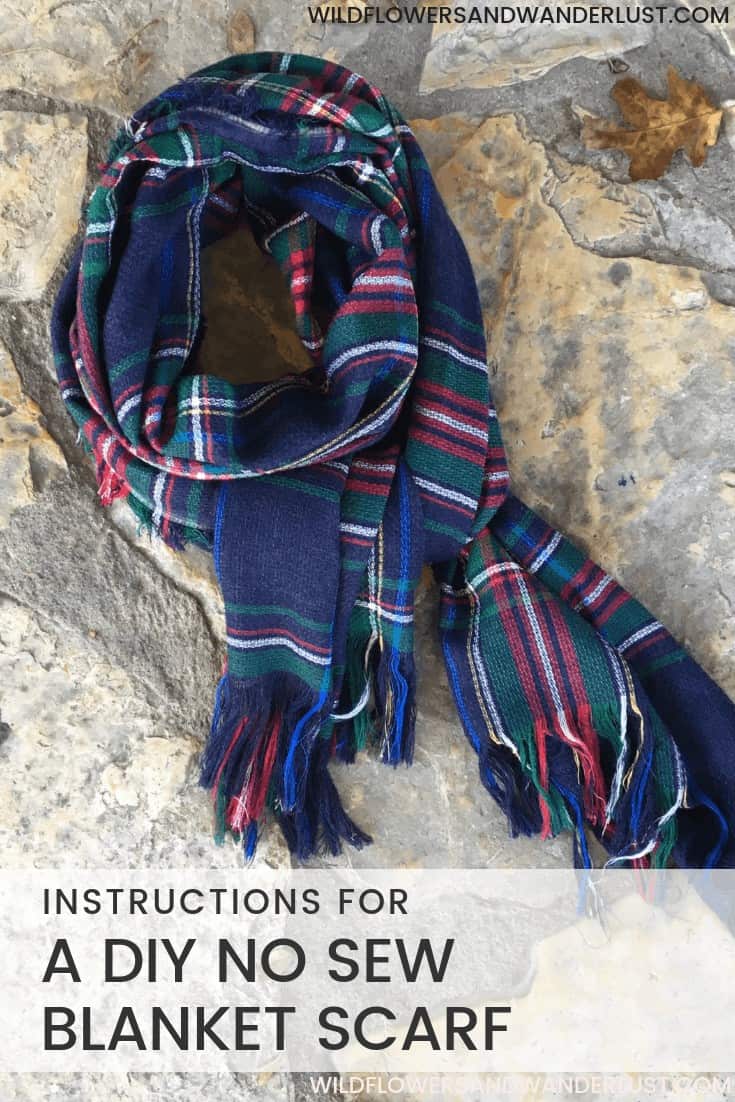
How to Make a No Sew Blanket Scarf Quickly
You can make your own blanket scarf easily while sitting in front of a cozy fire or a snuggly movie. Follow our easy tutorial and get to making those Christmas gifts this afternoon!
Easy DIY Flannel Scarf Tutorial
We all love our scarves and there’s nothing better than a plaid flannel scarf to dress up a sweater and jeans or add some style to a long solid jacket. The blanket scarf is the fall accessory and it shows no signs of going out of style.
Even if you live somewhere that doesn’t get too cold (like us) we still find lots of ways to wear our scarves. They’re a great accessory to an outfit and they can be just the right weight when a coat is too heavy.
Once you see how easy it is to make your own, you’ll wonder why you’ve been buying them all along!
Side note – these also make a great square tablecloth or table runner if you’re not interested in wearing a blanket scarf!
This project doesn’t even require a pattern – it just requires some fabric and scissors.
~This post may contain affiliate links. If you click one and make a purchase, I may receive a commission at no additional cost to you. This helps us fund creating great content for you! For more information click here ~

DIY Flannel Blanket Scarf Supplies
All you need to make your own blanket scarf is a supply of flannel and some scissors! Really, that’s all it takes.
You’ll want to use 1.5 to 2 yards of fabric for your scarf.
There are two ways to go about this, you can make yours a giant square, or you can cut it down the middle and make two scarves out of one piece of fabric. Look at the scarves that you already own and see which one you prefer before you go looking for fabric.
For our scarves we purchased shirting fleece, it’s a bit wider than some other fleece prints. The width can vary from 40″-60″. Ours was 52″ and it was perfect for slicing in half at two yards long. So one piece of fabric made two scarves.
If you have a fabric store nearby, it’s great to see and touch the fabrics, but here are a few options that we love.


If we were going with a square fabric we could have gone with a smaller cut and just made a single scarf. Either way works, it’s just a matter of preference.
Be sure that you’re not buying printed flannel – you’ll want your flannel to show on both sides and the printed ones are white on one side.
Typically the flannel will run around $9/yard at the fabric store (at the time of our project but be sure to watch for sales!). One cut is considered one item so if you have a coupon you’re in luck. You may sometimes find a good selection of plaid flannel at Hobby Lobby too.

Finishing Your DIY Blanket Scarf
We spread our fabric out on a long table and made a cut down the middle.
Be sure to check your fabric since the crease may not be the actual middle, depending on the width it can sometimes be off center.
Once you’ve finished cutting be sure that all your edges are straight.
We found that the edge that was cut in the store way very wavy so we went back and cut a straight line down it. At least cutting a straight line is super easy when it’s on plaid since all the lines are already there.
This is definitely one of those times when you appreciate a straight line on the fabric but if you’ve chosen something besides plaid you might need a straight edge or some chalk to help you out!
Also be sure to also remove the finished edge. That’s the only way to make it match the rest of your scarf so go ahead and cut it off too because it won’t fray like the rest of the fabric.
Once you’ve got your scarf cut it’s time to make the fringe.
Making the Fringe
You have to decide how much fringe you’d like on your scarf. For a square scarf we’d make it 1/4″ on all sides. For a long scarf you might make either of the long side 1/4″ fray and then 3″ fray on the ends.
Fortunately flannel doesn’t fray too much on its own so it’s easy to choose how long you want your edges to be and limit it to that.
You can cut straight lines on the long side every few inches to make it easier to fray. Using a seam ripper or a weeding tool will make it much easier to pull the threads out but it’s a great activity to do while you’re watching a movie.
You’ll want to fray your short edges first, then the longer ones.
And it helps if you are using something sharp to pull the strings. You may want to try starting in the middle, and working toward the edges. After a little practice you’ll find the way that works quickest for you.
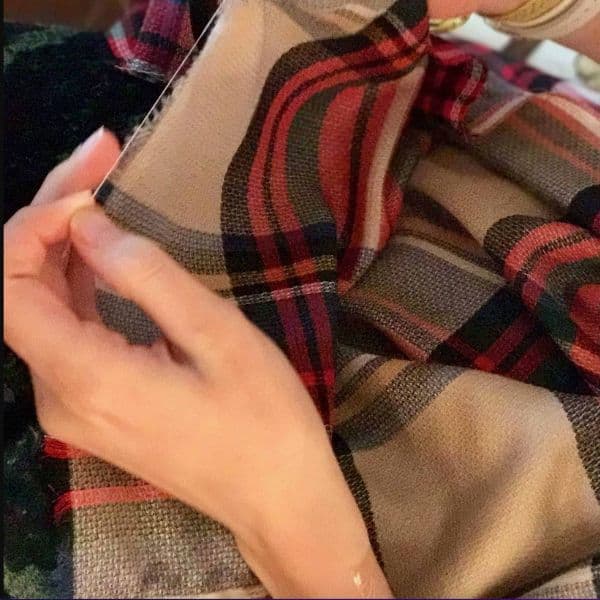
It took me a bit of experimenting on the first scarf but once I got into a rhythm it was easy and fast and every scarf after that went quickly.
You can use a comb on your frayed edges to make them a little fluffier. Just brush them gently and run your fingers over them to lay them flat. You may need to trim a stray piece at this point to even up your edges. For some reason I had a couple of really long pieces, but it was an easy fix!
That’s all there is to it! Now you just wear it out and soak up all the compliments knowing how easy it was to make. Then you make a stack of them for your friends!
Show us your photos of your scarves that you’ve made! We couldn’t love ours any more than we do and we’ve been amazed at all the compliments we’ve received!
Follow us on Pinterest and on Instagram for lot’s more ideas and inspiration!
You might also be interested in:


Hi there just wanted to give you a quick heads up and let you know a few of the pictures aren’t loading properly. I’m not sure why but I think its a linking issue. I’ve tried it in two different web browsers and both show the same results.
Hi Vina:
Thanks so much for letting us know and we apologize for that – we’ll work on getting those reloaded! Have a Happy New Year!
Wildchild
You made some good tips there.
Hello there,
My name is Aly and I would like to know if you would have any interest to have your website here at wildflowersandwanderlust.com promoted as a resource on our blog alychidesign.com ?
We are in the midst of updating our broken link resources to include current and up to date resources for our readers. Our resource links are manually approved allowing us to mark a link as a do-follow link as well
.
If you may be interested please in being included as a resource on our blog, please let me know.
Thanks,
Aly
Thank you so much – of course we’d love to be a resource. What category would we be included in and where would the link be?
Thank you!
FlowerGirl
Pretty!
Hi there, just wanted to tell you, I liked this article.
Keep on posting!