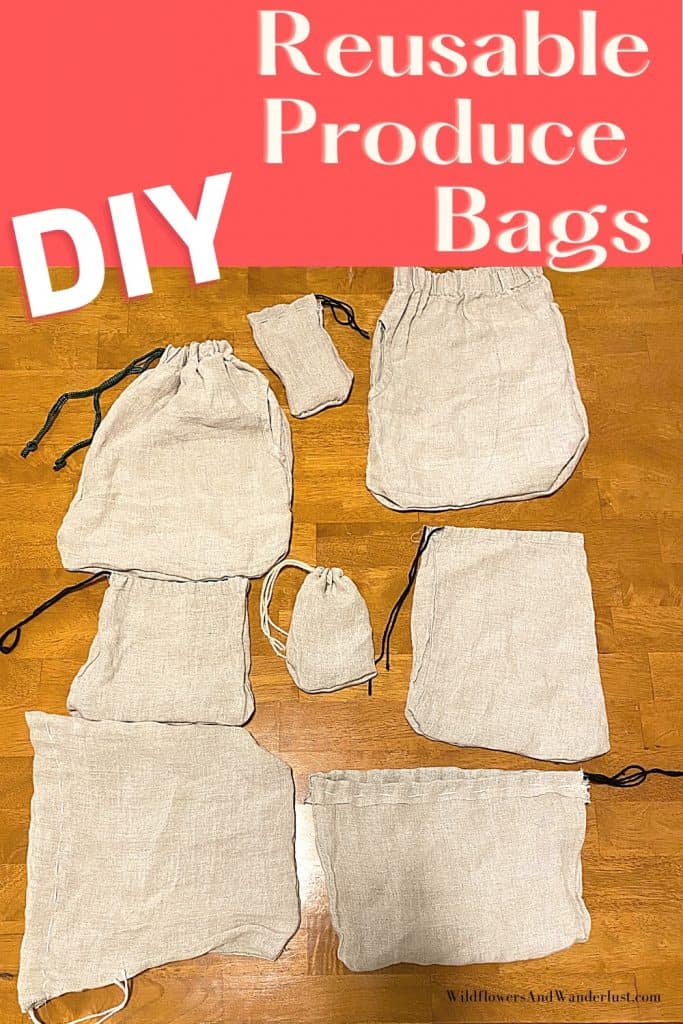
How to Easily Make Your own DIY Produce Bags
Here’s an easy DIY to make your own reusable produce bags. We used an old pair of linen pants but the tutorial will work for any material that you have on hand.
We are always looking for ways to reduce, reuse and recycle in our homes – especially since we love to craft!
Of course finding ways to create less waste is something that we strive to work on in our daily lives, and it’s an ongoing process. Anytime we’re able to recycle something into a completely new project it’s a win.
I had this super cute pair of linen pants that were completely worn out and I knew that recycling them would be the best plan. Linen is such an amazing material and since we needed some additional reusable produce bags this was the perfect way to reuse my pants!
~This post may contain affiliate links. If you click one and make a purchase, I may receive a commission at no additional cost to you. This helps us fund creating great content for you! For more information see our disclosure ~
What Fabric Should I use for My Produce Bags?
You can use just about any material that you’d like to make these bags but you’ll want to be sure that it’s lightweight and breathable.
You don’t want to suffocate your fresh produce.
This is a great way to reuse some of your more worn out clothing, or to pick up something at the thrift store that you can repurpose.
If you’re trying to decide what kind of fabric to use to create your own produce bags remember that it needs to be lightweight and washable. If it’s transparent that’s a bonus so that you can see what’s inside it without having to unpack!
Remember that whatever material you use it’s likely to be weighed with your produce inside so keep that in mind.
If you’re planning to upcycle – like I did, you can use an old curtain sheer or very fine tulle. I’m using linen since it’s what I have on hand. I won’t be able to see through it but it’s lightweight and sheer enough that I think I can guess what veggies are inside.
When I researched produce bags online it looks like many of them are made from cotton muslin so that’s another great option. Just remember that it’s not sheer so you won’t be able to see inside.
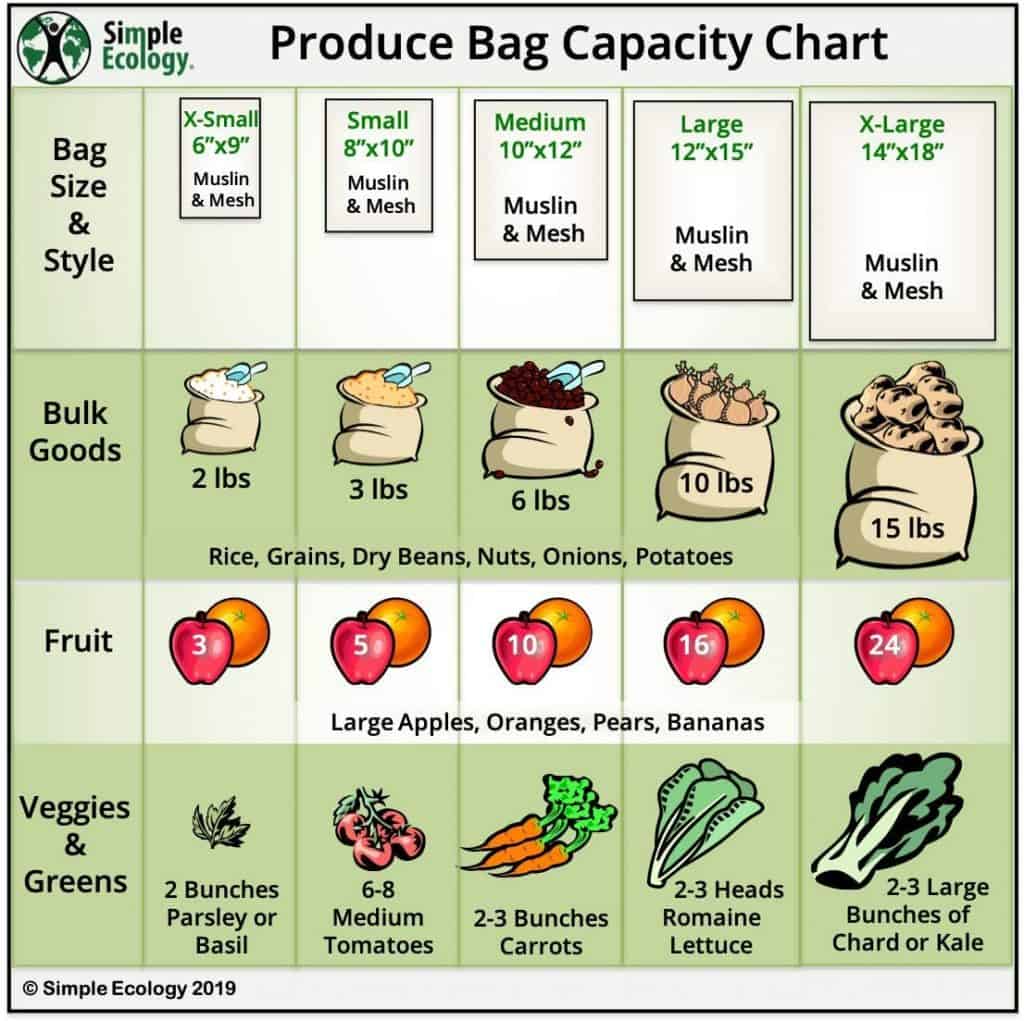
Produce Bag Size Chart
Here’s a handy chart by Simple Ecology which is a great place to find reusable produce bags to purchase. You can use this chart to decide which bags you’ll need the most of according to what you purchase the most of.
DIY Produce Bag Tutorial
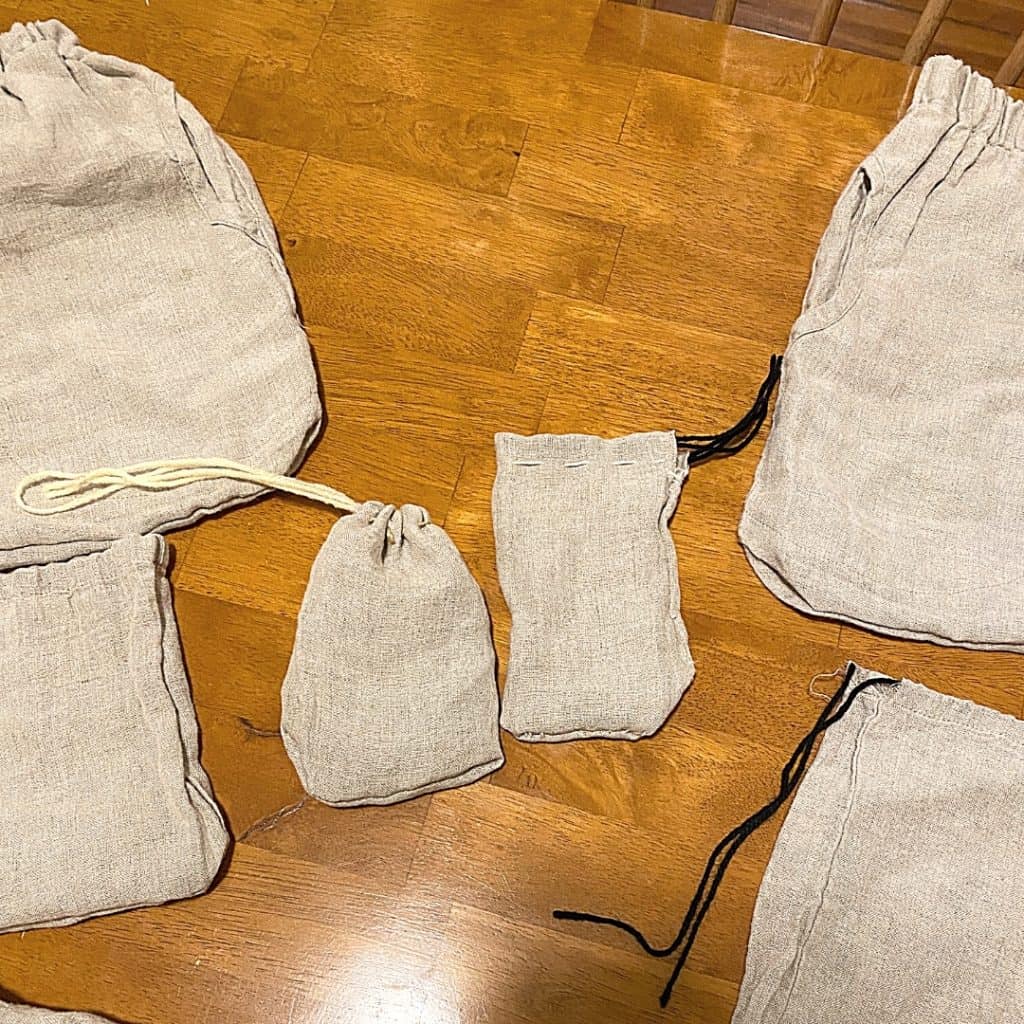
I am using an old pair of linen pants to create my reusable produce bags. I wanted my bags to be linen because I love these pants but they are so worn out that I don’t wear them anymore. I personally think that they are so pretty and I’m really happy with the finished project.
Of course if you have a sewing machine this project will be a lot quicker. I am hand sewing my bags but I think the funky stitching adds a little character to my project.

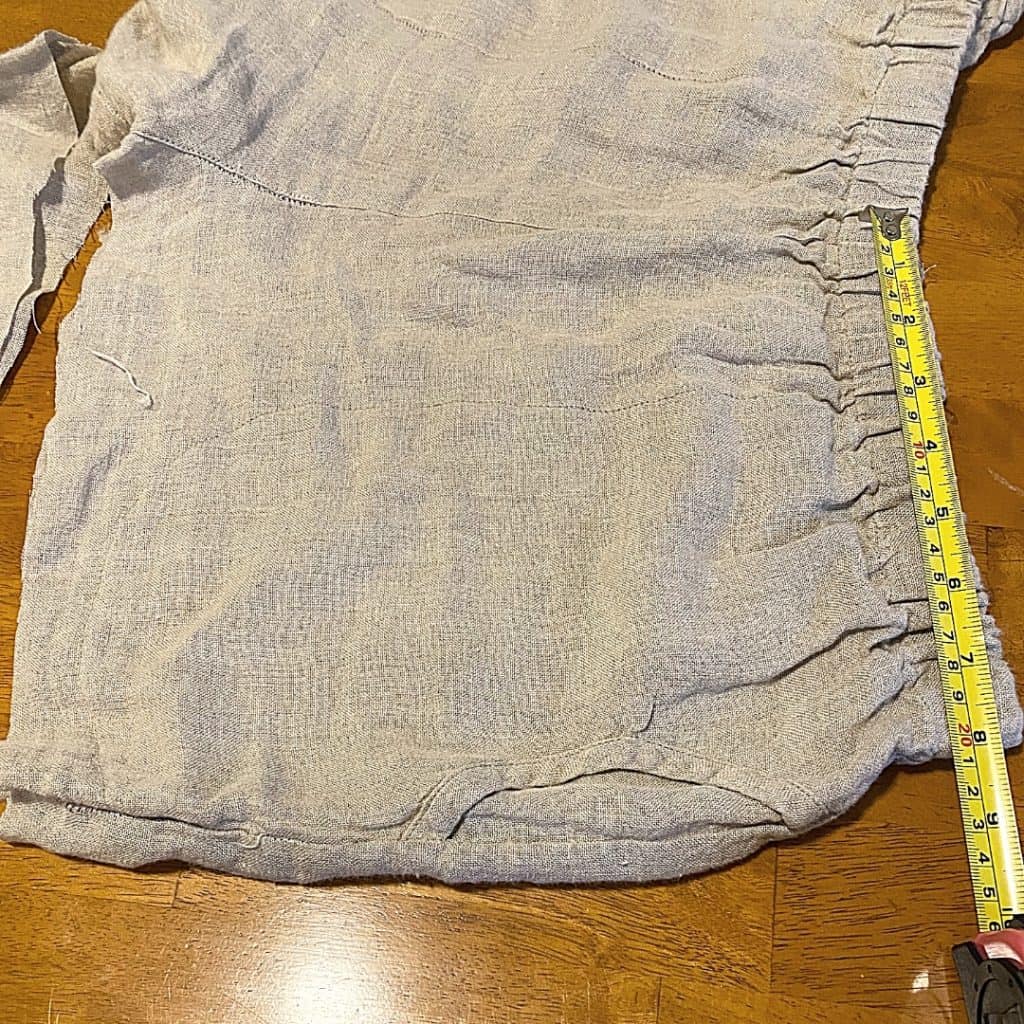
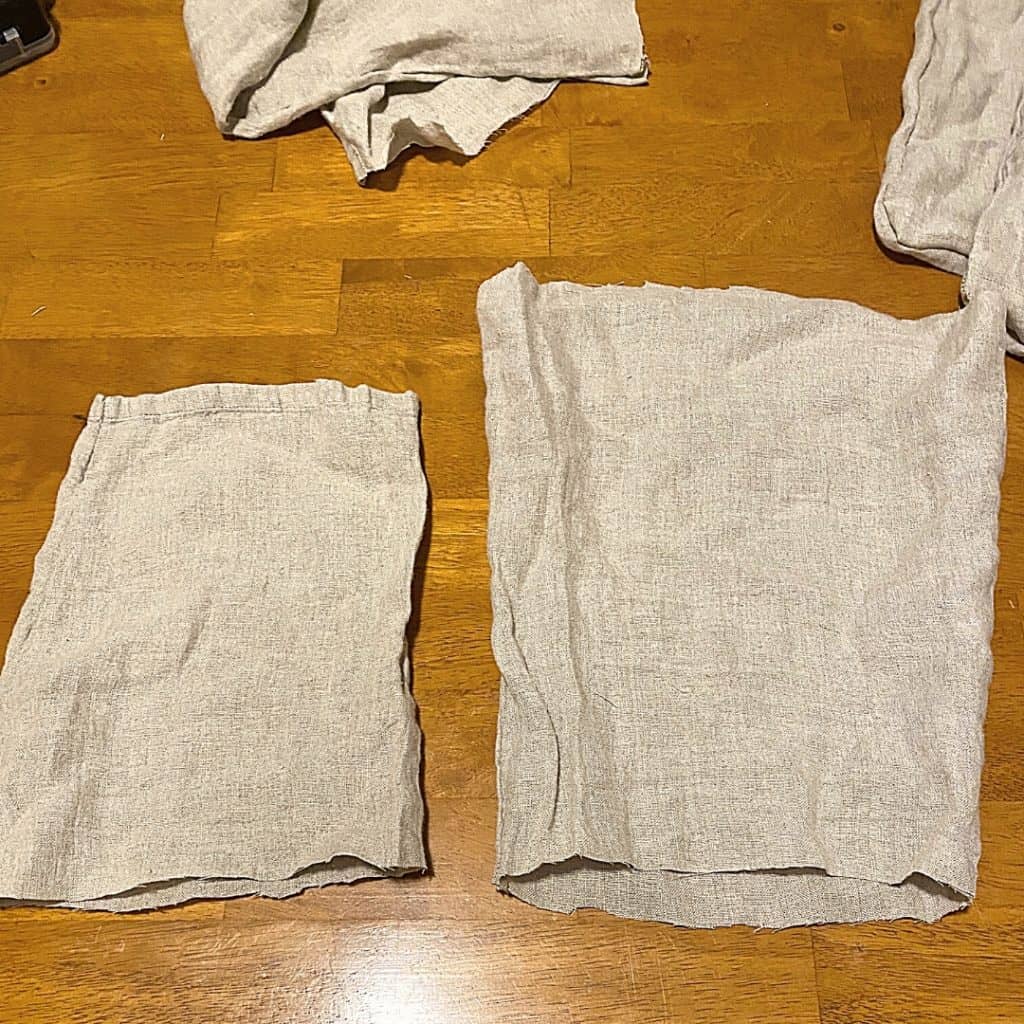
I measured out the parts of the pants to the sizes of bags I wanted to make.
I added my drawstring first since it is easier to push it through before the piece is all sewn up – I literally used a pen and put the string through it.
I used the waistband that was already in the pants for the drawstring area, so I didn’t have to create a tunnel for my first bags.
If you aren’t using the premade waistband area, use pins to hold the fabric in place where the drawstring will go and the go ahead and add the drawstring.
For the drawstring you can use any sort of ribbon, cord or string. Shoelaces are also a great idea (and another way to upcycle).
Once I had all my pieces measured out I turned them inside out and sewed them together. If you’re using a machine this part of the project will go really fast. If you’re hand sewing it will take a little bit longer but it’s not a hard project.
These are a great project to make a lot at the same time and in a variety of sizes. You are just making a rectangle and sewing the sides together.
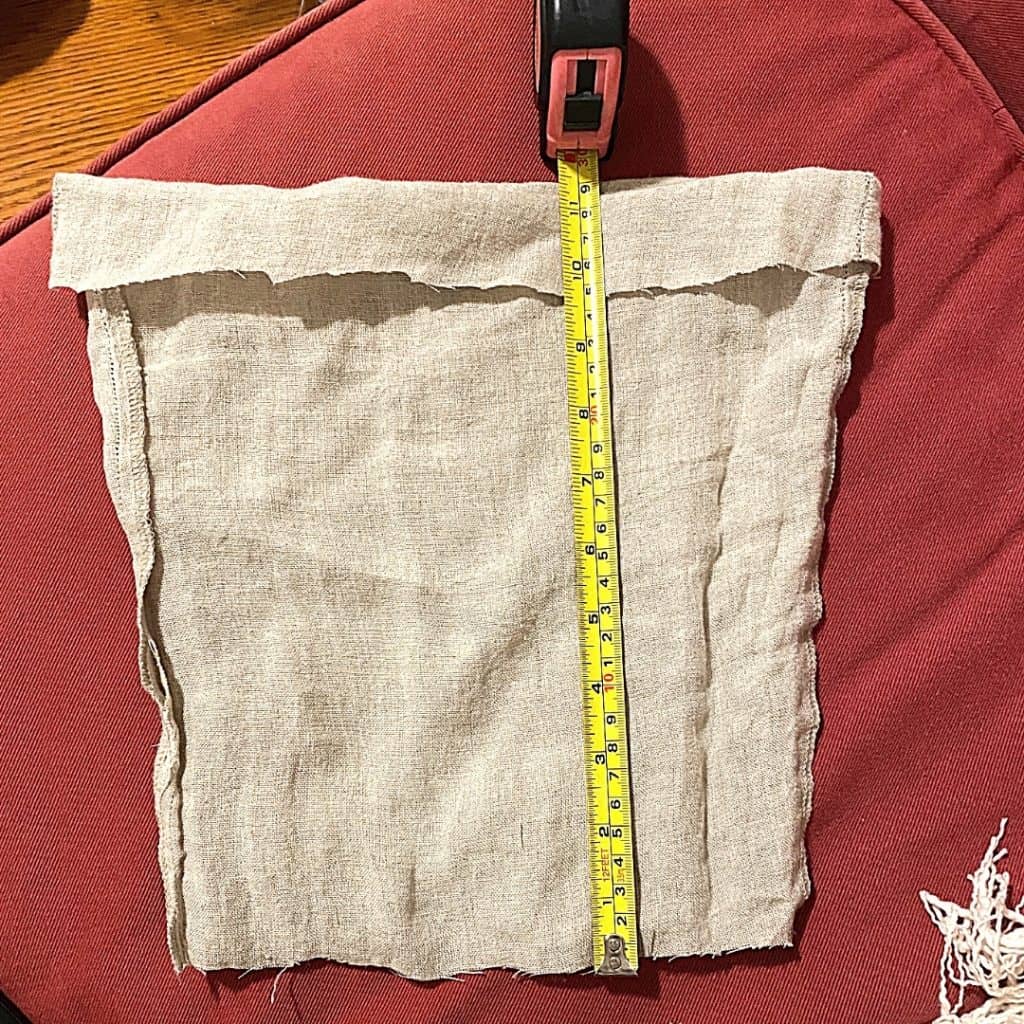
Be sure that your bag is double the size you want it so that you can stitch the pieces together. You’ll want to leave a little extra for your seams. If you’re using. a pair of pants like I did then all you have to do is stitch your bottom together and add a tie at the top!
For the smaller bags I had to cut out rectangles and stitch all the sides.
How to Cut Your Material
Cut your rectangles at least an inch larger all around than what you want your produce bag size to be.
Depending on the material that you use you may need to make a zig zag stitch so that it will hold together when your bags have weight in them. It wouldn’t be a great plan if you made them to carry tomatoes and then the bag opened up and your tomatoes rolled all over the ground!
Sew down each side, then across the bottom. Don’t worry, you can flip your seams inside so no one will see if they’re not perfect!
Next roll the top or your bag down to add the channel for your drawstring. Be sure that you only sew through one side for your drawstring and not through the entire bag.
The channel needs to be about 3 times the size of your bag so that it has plenty of room too move.
You can also leave the drawstrings out of your produce bags if you’d like, they’ll work just fine folded over.
Make sure that your cord is longer than double the size of your opening by about two inches. You can push the cord through with a pen or you can attach a safety pin to the cord and feed it through.
Then flip your bag inside out! Or don’t.
You might prefer to show off your stitching and raw edges.
Storage Tips for Produce
Now that we’ve got our cute new bags finished we’re heading out to the farmer’s market to pick up some produce.
We thought we’d share a few tips on keeping produce fresh.
You know that different foods all have different requirements as far as temperature and humidity that will help them stay fresh longer. We’ll use our bags for hauling our goodies but once they’re home we’ll store them the best we can.
Storage Tips:
- Most fruits should be left on the counter for storing. If they become very ripe you can move them to the fridge until you’re ready to use them. This includes tomatoes – don’t put them in the fridge!
- Store in a cool, dry place – onions and potatoes. Try not to store them together though!
- Foods that can go directly into the fridge (even in your reusable bags) – apples, pears, grapes, citrus, cucumbers, beans, zucchini, carrots and mushrooms.
- Keep all those greens in the fridge and note that they like to be a bit damp. I like to rinse them and then put a towel scrap in their container to soak up any extra liquid but maintain a little moisture. (We used paper towels before we decided to try zero waste.)
Herbs have their very own needs which are just as varied as all the different fruits and veggies. Here is a great resource to find out how to store them for best results.
If you’re not sure how to store your items it’s best to keep them in the fridge in an open container. Here are a couple of other lists that you can check:
The alphabetical list does have some suggestions using plastic but it’s one of the more in depth lists that we found when we were looking for information. It also includes a handy chart on which thing to eat first.
If you like this you might also enjoy:
- Fall foods for great skin
- Tips for Going Green at the Grocery Store
- How to Sell Used Clothes for Money
- Make a Himalayan Salt Bath
I hope you enjoyed all this fun info. I really enjoyed using my linen pants. It was easy to incorporate so many parts of the pants into the project. I reused the waist band by removing the elastic and left the pockets so my veggies can have other veggie and herb friends.
I was able to use the rest of the pants as more fabric. I even used the bottom of the pants stitching as some of my drawstrings. My bags turned out a little funky and fun and they were easy to make. They’re also easy to customize to your liking.
Have you made your own produce bags? Have you purchased reusable produce bags? We’d love to see your ideas in the comments below!