How to DIY Shibori and Have the Most Fun
Have you ever seen a DIY Shibori kit, or an indigo dye kit? You can learn to do this and it’s a fun and interesting project so follow along to see ours!
By now you’ve probably seen a few shibori, or indigo dyed items.
This popular dyeing method is enjoying its time in the limelight lately and for good reason. It makes the most beautiful indigo blue color and designs but it has the appeal of tie dye without the neon colors.
If you haven’t tried it, I bet you didn’t know how easy it is to DIY shibori.
~This post may contain affiliate links. If you click one and make a purchase, I may receive a commission at no additional cost to you. This helps us fund creating great content for you! For more information click here ~
What is Shibori
Shibori is a Japanese resist dyeing technique.
Resist dyeing means that only the parts of the fabric that are exposed will get colored and the rest will remain their natural color. Basically you “resist” or prevent the dye from reaching sections of the fabric by twisting, tying and folding the fabric.
Shibori is generally associated with indigo dye but it’s more about the patterns than the color.
Indigo is a natural dye and has been used for centuries. It has a beautiful deep color and is well loved worldwide.
There are many different techniques in DIY shibori to achieve different patterns and they all involve different ways of folding or binding your fabric.
We used small pieces of wood and rubber bands to form different patterns. You can use different folding and binding techniques to create different patterns, and you are only limited by your imagination.
DIY Shibori is a fun project to work on outdoors. I’d actually recommend doing it outdoors.
You’re using buckets of dye so being able to use your water hose is one of the easiest ways to work on this project. If you’re using the dye inside you’ll want to be sure to protect any surfaces near your workspace with plastic or a drop cloth.
Now that we’ve tried it we’re excited to make some bigger items and try some other natural dyes.
Future projects for sure!
DIY Shibori Supplies
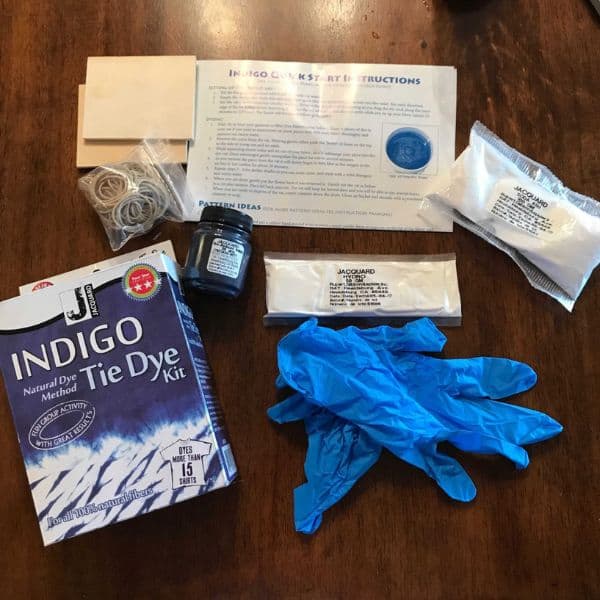
- An indigo dye kit
- cloth or items to dye – we used these dish towels the first time
- 5 gallon bucket
- A paint stirrer or long spoon or stick
- rubber gloves!!
- Thin Wood pieces
- String or rubber bands
- More rubber gloves (you don’t want blue hands)
- Scissors
- Cold Water
- A tarp or drop cloth
The kit comes with several items that you can use like rubber bands and gloves so check it out first to see what items you might want to add.
When you choose the items that you’re going to dye you want to be sure that they’re natural fibers. Cotton, linen, silk and wool are the best fabrics to use. Of course we’re going to say start with cotton since it’s likely the least expensive!
We used rectangle cotton dish towels for our first project, but now we’ve picked up all kinds of things to try!
Another easy first time project could be a pillowcase or placemats and these are easy to find in 100% cotton.
How to Make Your DIY Shibori Dye
The directions included with this dye kit are pretty self explanatory. That made it a lot easier to use the first time we tried it.
Be sure to wear rubber gloves for this part! I promise you don’t want to dye your hands with this deep blue dye.
You kit may come with rubber gloves but double check that they have a nice fit to them before you commit, and also realize that you may need more than one pair.
Actually, you’ll definitely need more than one pair if you’re using disposable gloves. They are impossible to take off and put back on.
We loved using our dishwashing gloves, just remember they may stain with the dye.
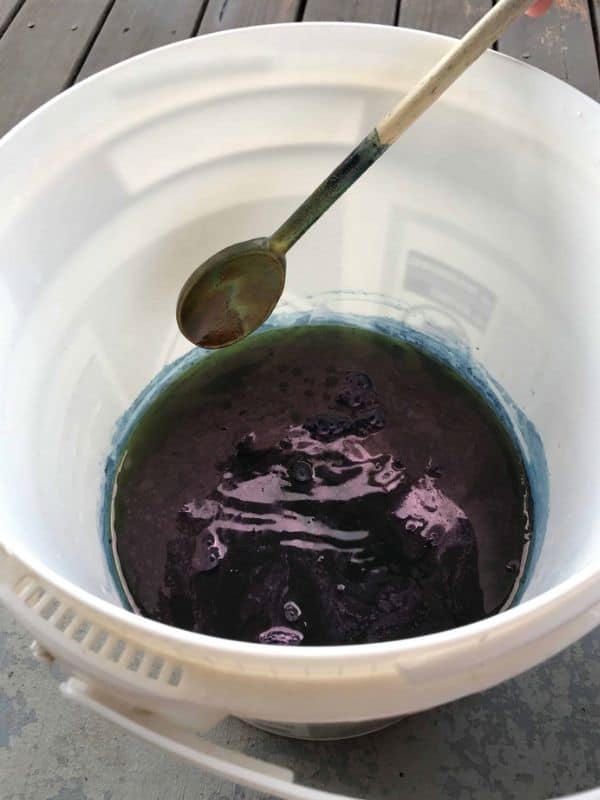
Mix Up Your Dye
Fill your 5 gallon bucket with 4 gallons of water, add your indigo dye and stir.
Once the dye has dissolved into the water add the soda ash and stir.
Be very gentle with your stirring because you don’t want your dye to start oxidizing. The dye has to sit for awhile before it’s ready to use, be sure to check your directions but it may take from 30 minutes to an hour.
Let It Sit
We used this time to fold our fabric.
Your directions may tell you to wait until the “flower” appears on top of the solution. This was the one part that was confusing.
If you haven’t done this process before it’s hard to know what that is.
When you open your bucket and see a foamy top to it, it’s ready to use. When you move the foam “flower” out of the way the dye will have a neon green tint to it. It may appear foamy or oily, just gently push it out of the way and be sure that your fabrics don’t touch it.
Folding Your Designs

There are a variety of ways to fold your fabrics and they will each give you different results in your designs.
This is definitely the DIY Shibori part – it’s where you really get to show your creativity!
Just keep in mind that the covered areas will stay white and the edges will take the dye. These make some pretty amazing patterns.

Try folding your items in an accordion pleat and then rubber band them together.
Try using a square in the middle and folding your fabric around it with rubber bands.
We also used a piece of wood that was the same width as our fabric, accordion pleat the fabric and used rubber bands to hold it together.
And of course you can grab sections of your fabric, bunch them up and rubber band them. I think we all did this tie dye process as kids right?
Dyeing Your Designs
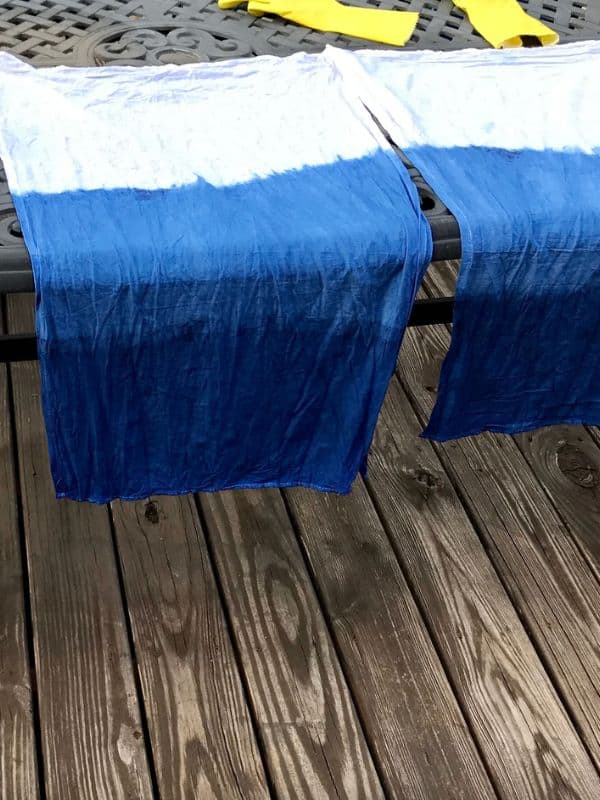
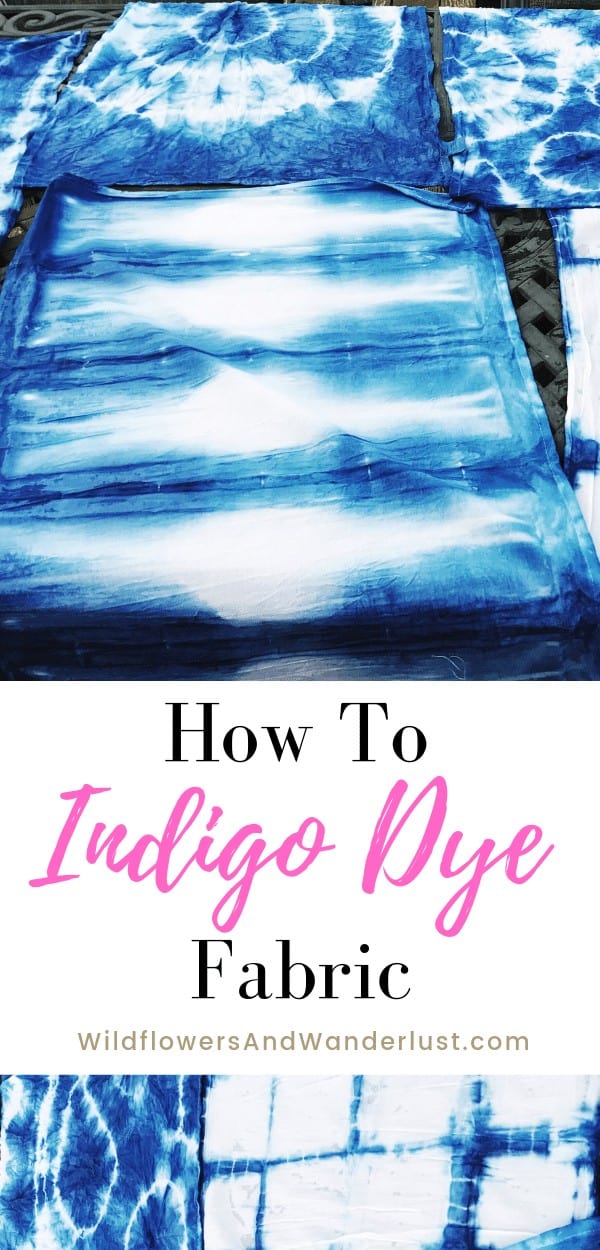
We made these towels using the dip dye technique – we just laid them over the sides of the bucket and then slowly raised them a bit at a time, letting each layer get a little darker toward the bottom.
Once you have all your designs tied and bound up you want to rinse them with water before dyeing them. Squeeze out as much of the freshwater as you can and then place them in your dye bucket.
Keep the items fully submerged in the dye buckets and you can squeeze and manipulate them while they’re in the dye. Try not to disturb the water too much so it doesn’t oxidize.
This is one of the toughest parts of the process, keeping items fully submerged in the dye.
If you get oxidation on the top of your dye it can change the pattern and cause discoloration on your items.
If you have sediment on the bottom be careful that your fabric doesn’t touch it. You may need to add some weight on your fabrics to hold them fully submerged.
The longer you leave your fabrics in the dye, the darker the colors will be.
5-10 minutes is generally a great amount of time for your fabric to sit before you pull it out. It will lighten up as the fabric dries. If you want a darker color you can put your fabric back into your solution for more time.
Finishing Your DIY Shibori
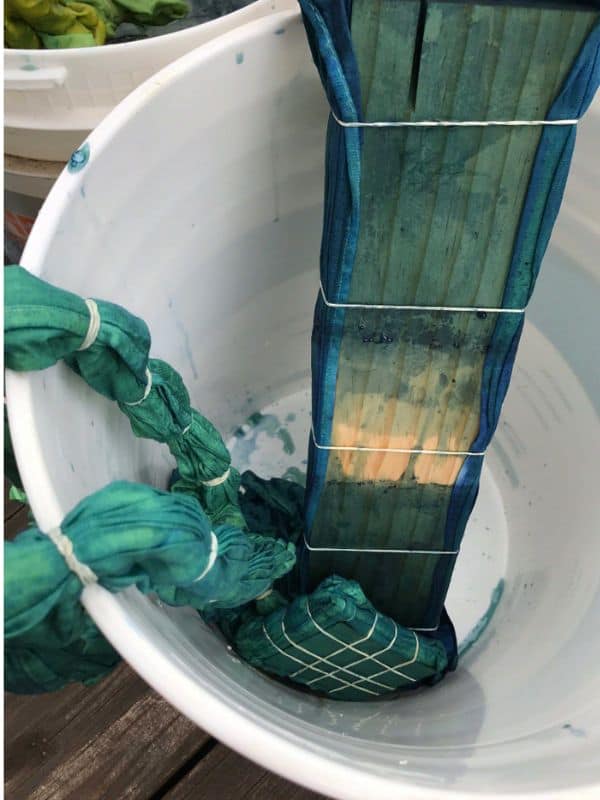
When you remove your items from the dye they are actually a bright green color. It’s so interesting to actually watch the dye oxidize. The air causes the dye to oxidize and you can literally watch it change in minutes.
Remember that the dye is going to look much darker while the fabric is wet so once it has oxidized you can put it back into the vat for more time if you’d like it to be darker.
It’s best to leave the pieces bound up while they oxidize so that the patterns will develop. We let ours set for a couple of hours before we started removing their bindings.
This help keep the designs a little more crisp and keeps the colors from bleeding into your “resist” areas.
When we removed the bindings there were still a few areas that were green and we watched them oxidize when they hit the air.
Be sure to rinse your designs with fresh water before you remove any of their binding so that the dye has a chance to set.
Isn’t it surprising that the fabric isn’t completely soaked in dye if you leave it in there for 10 minutes? You’d think that’s what would happen but you’ll be pleasantly surprised when you unfold it that all that binding keeps areas of it white.
Be sure to wear gloves when you start working with the fabric again, even if you let them sit for several hours. Protect those pretty hands!

Once you’ve removed all of your strings and rubber bands spread your fabric out to let it air dry. A few spots may look green while they finish oxidizing and you will get a chance to watch them while they finish drying.
Wash and dry your items to set the dye.
We’ve had no trouble with the dye bleeding once we were finished with the project. We use our dish towels regularly and absolutely love the bright blue colors. Which of course prompted us to buy lots more items to dye!
Here are some fun ways to fold: Shibori Folding Techniques
Be sure to check out more craft ideas:
Make a Dip Dye Tassle
Amazing Alcohol Ink Projects
Make All Natural Dyes (you can use these for fabric too)
Easy Marble Coffee Mugs
Be sure to pin this so you can save the project for a sunny weekend!
Follow us on Pinterest and on Instagram for lot’s more ideas and inspiration!
DIY Shibori

Simple How-to for Indigo dye fabric items
Materials
- An indigo dye kit
- cloth or items to dye - like dish towels
- rubber gloves!!
- Wood pieces - we used a mix of what was included in the kit and what we had laying about
- String or rubber bands
- More rubber gloves (you don't want blue hands)
Tools
- Painters Stick or Spoon you don't mind dyeing
- 5 gallon bucket
- Scissors
- Cold Water
- Tarp or Drop Cloth
Instructions
- Follow your kit instructions to mix your dye. Ours was 4 gallons of water, mix in dye and stir just until it's combined. Once the dye has dissolved in the water, add the soda ash and stir. Be sure to stir slowly to prevent oxidizing. Cover with a lid and let sit for 30 minutes to an hour.
- Fold your fabric. Remember the arrives that don't touch the dye will stay white. Try folding your items in an accordion pleat and rubber band them together. You can also try using a square in the middle and folding your fabric around it with rubber bands. You can also go with a classic tie-dye bunch.
- The dye is ready when it has a foamy "flower" on the top. Once you have confirmed the dye is ready, soak your folded fabrics and squeeze out as much of the water as possible and place in the dye bucket.
- When your items are fully submerged in the dye bucket you may need to push them down into the water. Try not to disturb the dye to prevent oxidizing throughout. We left ours for 5-10 minutes, but the longer you leave them, the darker the dye will be. Put gloves on and rinse the designs with freshwater before remove the binding.
- Once the strings and rubber bands are removed, leave the fabrics out to air dry. Once fully dry, wash and dry to set the dye.
Notes
Wear gloves!!!